Call us toll free:
8619709992541 [email protected]
Jctprint Machinery Co., Ltd
In flexographic and coating production, the anilox roller is one of the most important—and expensive—consumable components affecting print consistency. Poor cleaning, incorrect handling, aggressive chemicals, or improper storage can shorten roller life and reduce ink transfer accuracy long before the ceramic surface is truly worn out.
Core idea
Most premature “anilox wear” is actually plugging, scoring, corrosion, or handling damage. Extending service life means preventing those four failure modes systematically.
The expensive mistake to avoid
Waiting until density drops or streaks appear usually means cells are already heavily plugged or the surface has been damaged by repeated emergency cleaning. Preventive maintenance is cheaper than recovery cleaning.
|
Failure mode |
Typical cause |
Visible symptom |
|---|---|---|
|
Cell plugging |
Dried ink, coating, adhesive, or pigment buildup |
Low density, dirty print, inconsistent transfer |
|
Scoring / scratching |
Improper handling, metal tools, debris, doctor blade issues |
Lines, streaks, permanent damage |
|
Chemical attack / corrosion |
Incorrect cleaner concentration or chemistry |
Dull surface, damaged cells, shortened life |
|
Mechanical impact damage |
Dropped roller, hard contact during install/storage |
Chips, cracks, localized defects |
The single biggest life extender is timely cleaning. Once ink or coating dries inside the engraved cells, operators often compensate with harsher chemicals or aggressive scrubbing—both of which increase wear risk.
Daily cleaning baseline
1.Remove excess ink immediately after the job ends.
2.Use the cleaner recommended for the ink/coating chemistry (water-based, solvent, UV, adhesive, etc.).
3.Rinse thoroughly so cleaner residue does not remain in the cells.
4.Dry the roller before storage or reinstallation.
Avoid metal picks, screwdrivers, abrasive pads, or anything harder than the recommended cleaning media.
|
Contamination level |
Recommended approach |
Avoid |
|---|---|---|
|
Fresh ink / light residue |
Routine chemical wash + soft brush/cloth |
Overly strong chemistry “just in case” |
|
Moderate buildup |
Ultrasonic or approved automated cleaning |
Excessive dwell time or heat beyond spec |
|
Heavy plugging |
Professional deep cleaning / controlled process |
Aggressive scraping or random abrasive blasting |
Ultrasonic cleaning is effective when used correctly, but time, temperature, and chemistry concentration must follow the equipment and roller supplier’s guidance.


Inspection after cleaning matters as much as the cleaning itself—especially for catching early plugging or scoring.
Handling rules that save rollers
1.Lift with proper supports; never drag the ceramic surface.
2.Keep tools, fasteners, and metal debris away from the roller face.
3.Check doctor blades and chambers for burrs or trapped particles before startup.
4.Use protective covers during transport and storage.
A single impact chip can create a repeating print defect and may require expensive refurbishment or replacement.
|
Good storage practice |
Why it matters |
|---|---|
|
Clean and dry before storage |
Prevents dried contamination and corrosion risk |
|
Use padded racks or dedicated sleeves/covers |
Prevents contact damage and accidental impacts |
|
Stable, clean environment |
Reduces dust, debris, and moisture exposure |
|
Do not stack rollers against each other |
Avoids surface contact and edge chipping |
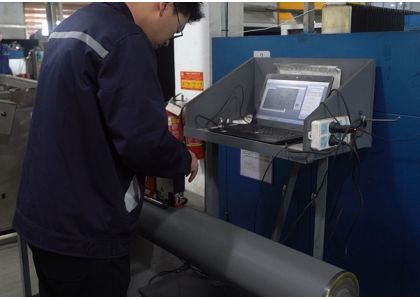
A roller can look “clean enough” but still have reduced cell volume. Periodic measurement with an anilox inspection system (microscope/cell-volume analysis) helps distinguish recoverable plugging from true wear.
Inspection cadence
•Record a baseline when the roller is new or freshly refurbished.
•Recheck on a schedule tied to press hours, ink type, and job severity.
•Track cell volume trend, not just pass/fail snapshots.
Incorrect doctor blade pressure, contaminated ink, or excessive press vibration can accelerate wear. A few process controls help protect the roller:
•Use the lowest doctor blade pressure that achieves clean wiping.
•Filter ink/coating systems to reduce hard-particle contamination.
•Keep viscosity and temperature stable to reduce dried buildup and inconsistent transfer.
•Match line screen/cell volume to the application so the roller is not constantly overloaded.
Practical weekly checklist
JCTPRINT manufactures ceramic anilox rollers and related flexographic rollers for printing and coating applications. If you are setting up a maintenance program, the useful supplier inputs are recommended cleaning compatibility, handling guidance, and inspection baselines for your specific cell specification—not just the roller part number.
To extend anilox roller service life, focus on four habits: clean before residue hardens, use the right cleaning method, prevent physical damage, and verify condition with periodic inspection. That combination protects cell geometry, maintains ink transfer consistency, and reduces the need for premature refurbishment or replacement.
Need help selecting a cleaning-safe ceramic anilox roller, checking cell volume loss, or matching a roller to your flexo/coating application? Contact JCTPRINT for technical support and quotation assistance.

![]()
![]()
![]()


